crafting with kids

Kids love to craft.  They love to draw, glue, paint, cut, and all the rest.  I totally love it too.  And I love watching kids get excited at what they can make.  Teaching crafting is so different than teaching math.  In math there is definitely a right answer.  In crafting the only right answer is, "I love this".  At least that's my goal when I craft with kids.


The other day we had some friends come make some god's eyes with us.  Do you remember making those at summer camp?  We had a fun time, and everyone enjoyed the process, and the product. Success!


After crafting with my own girls on a regular basis, and teaching sewing, knitting, and crochet in a classroom setting, I've developed a few survival skills for crafting with kids. Go check them out over at Krystina's blog, Lollipops.

new baby pom pom beanies!!


Here's my first batch of knit beanies for the shop!!  I can't get enough of the pom poms, I want to put one on everything.  These come in a few different sizes for baby because they just don't stop growing.  Made from super soft acrylic yarn for an itch free experience.  Blues and greens for the boys...


Pinks and oranges for the girls...The color combo's of the diamond patterns are super fun and lively.  The ombre stripes are a classic look you can wear with anything.  Babies are sold separately.

Coming soon:  Kid and adult knit beanies!

Super thanks to Toni Weber Photography for the beautiful photos.  And thanks a million to my precious baby models and their parents.


an evening walk


The other night was so beautiful, warm, and still.  So, my girls and I took an evening walk through the neighborhood.  Yes, this is our neighborhood, and we are thankful. every. day. 


Looking back at these photos I see traces of a little girl.  A little girl who won't be little too much longer.  Her legs are getting longer and skinnier.  She can do so many things on her own.


But she is still my baby, and always will be.  
And I will always be her mama.

break's over


School's back in session.  We had a fun week off with special guests visiting, birthday celebrations, plenty of beach and sunshine. 


I really enjoyed watching their little minds work this morning.  I could almost see the gears spinning.  After a few mental push ups and crunches, it's usually time for a salty hot chocolate and a read aloud cuddle on the couch.  So thankful.


right now

Right now, we are:


  • ready to say hello to fall.
  • happy to welcome our new friend the caterpillar, Hank, who will soon become a butterfly right in our very own dining room.
  • enjoying our first year of full time homeschooling
  • taking bike rides all over town
  • taking advantage of the warm afternoons with some fun nature hikes
  • reading some amazing literature

behind the scenes with toni weber photography


I love "behind the scenes" photos.  They are just as exciting to me as "before and after" photos.  There's so much you can learn by seeing how a shot is staged, where the light source is coming from, and the results that are achieved.

I've always, always loved Toni Weber's photography style.  She gets such a soft and warm feel with such natural poses.  Here's some fun before and after scenes of me taking a picture of her taking a picture of Ginger, and then the shot she got.  (try to refrain here from judging my shots next to hers, not fair).


{photo source Toni Weber photography}

Toni decided it would be best to go out in the early evening.  We brought a couple different outfits for Ginger to change into to get some variety.  This spot down by the bay gave us some nice scenery choices and also felt like home, which helped Ginger enjoy herself.

With both of us buzzing around with our big cameras, we actually had one guy come ask us who the celebrity (Ginger) was!  We told him he probably wouldn't have heard of her.


{photo source: Toni Weber Photography}

{photo source: Toni Weber Photography}

{photo source: Toni Weber Photography}

Toni is a good buddy of mine, who owns a photography business here on the California Central Coast.  She loves to take portraits of children, and adults, as well as lifestyle photos.  She does such a great job of helping her model find natural, flattering poses and has a way of bringing out their personality.  You can visit her on her blog, website, and facebook.

a new beach hoodie


Ruby has a new beach hoodie for the summer time foggy mornings at the beach.
It was a hand me down, too big, boy sweatshirt with a skull on the chest.  
But, where there is a large aqua zipper, there is potential.

We knew the sweatshirt would be usable if we could think of a creative way to cover up that skull.  
(We are not partial to skulls on our belongings in this house).
We thought of various shapes to applique on.  None of them seemed quite right.  Then I knew when our buddy Toni came over for a visit that she would have a great idea.  (You can always count on Toni for great ideas!). 
 She had an idea for us right away!  A doily!
I have a basket full of vintage thrifted doilies for such occasions as this, but they were all too large.  I knew in time I would come across just the right size, or I could even buy a new one at the craft store.  I couldn't wait.  I made one.  I found the doily pattern here.  I also put a new white string in the hood to tie it all together.  Now I want to put a doily on everything.  And you know what they say in Portlandia...


happy feet

 Yesterday was one of those days.  The girls knew exactly what to do with themselves.  What girl doesn't?  
The sun was shining in the afternoon sky.  The air was still and warm.  They all ran inside from the car ride home, grabbed the beach blanket, a snack, and headed for the backyard to soak up the day.

 The natural progression from sun soaking to pedicures is a phenomenon.  

 It can take quite some time picking just the right shade.
  Especially when you're relaxed.


These are some happy feet.

summer sunhats


I have put my crochet hook aside for a while.  I can feel summer getting closer and closer.  It's no secret that I love a floppy hat.

These summer hats for girls were so fun to put together.  I made the pattern to fit a girl anywhere from 3 to 7 years old, pretty much any girl who would fit a hat circumference of 22". 

They have two fun vintage lace stripes on the brim.  And they tie under the chin (such a necessity).

As usual, I've put some vintage sheet material as the liner.  I couldn't resist.

These are now available in the shop.

Coming soon....infant sunhats....with ruffles!

a cats cradle lesson

Cats Cradle (also known as Jack in the Pulpit) is one of those games you learn as a kid, and then remember again when you have kids.  It is most likely dated back to ancient China.  It is a string game, played by two people, who aim to make a set of figures (cats cradle being one of them).


1) To set it up, you wind the yarn (this one is 48" long then tied together) around the palm of your hands.
2)  Slip your middle finger under the loop from your opposite hand.  Do this with both middle fingers.
3) Now you've created your first figure "Cat's Cradle"


4) Now the next player pinches the X's with thumb and pointer.
5) She then loops them around the outside string, and up through the middle
6) The first player slips her hands out, and the new player opens her fingers up to create the new figure "Soldiers Bed"


7) Now it's the first players turn again.  She pinches the X's.
8) Pulls them around and then up.
9) Opens her fingers as the other player takes her fingers out.  This figure is called "Candles".


10) This one is the trickiest.  The next player grabs each "candle" with her pinkies.  Each pinky grabbing the candle opposite (so that you actually criss cross your hands to grab the strings).
11)  She pulls them over the outer strings and up through the middle. (all the while, her pinkies are still holding the "candles")
12)  The first player removes her hands, while the new player opens her thumb and pointer.  This figure is now "Manger".


13) The new player reaches in to pinch the X's.
14) She pulls them up, over the string, down, and then up through the middle again.
15) She opens her fingers, the other player takes hers away, and it's back to "Soldiers Bed"

The game can go indefinitely.  You either get all tangled up at some point, or someone decides they've had enough.  Or, you could go on to try for the next worlds record in Cat's Cradle!

sister sweater


It wasn't super easy to find a simple crochet cardigan sweater pattern in a girl size.  But I knew I would find what I was looking for in the vintage pattern section of etsy.  This pattern booklet was so 80's, it was perfect.

It was just a few different panels (front sections, back, sleeves), then weave them all together.  The yoke was last with the color contrast.


I told the girls "it's just one stitch after another, then pretty soon, it's a sweater!"

sister sweater!


neon prairie girls

Next week my new sewing class begins.  It's going to be a beginners Embroidery class!  We will be studying early American History this trimester in school, and didn't all those prairie girls embroider?  My little students will learn the basics, and then make their own, modern day sampler.  (neon colors included!)

I was about 8 when I learned how to embroider.  My family was living in Kentucky then, and the winters were long and cold.  After a fun afternoon of sledding, I can remember curling up by the fire and following along with the Reader's Digest Complete guide to Needlework learning all the stitches there were to learn.

I can't wait to relive my fond memories of learning this new skill while I teach those eager modern day prairie girls!

button craft


This Friday in sewing class the kids are going to do some button work. They just love buttons! Why is that? When I get to the button sewing part in whatever project I'm working on, I'm usually not that eager. But these kids could sew buttons all day long.


What I have them do is draw an outline shape onto their felt, and then fill it in with buttons to "color" their picture. This craft very much reminds me of one of my favorite Queen Bee Market vendors,Audra from Smitten. She makes some beautiful button art, along with restoring great vintage items.


It's also a great way to use up that huge can of buttons you have in the cupboard!

sewing lessons :: needle book

I will begin teaching my 4th session Beginning Hand Sewing class this Friday. I just love this class! The students are kinder through 2nd graders (girls and boys!). I've been learning alot about how to teach this craft I love so much. Keeping the projects simple (with room for my advanced students to grow), and keeping my expectations realistic have been my main focus as a teacher. We use mostly felt for our projects which is so easy to work with and comes in amazing colors.

I often start each session (an 8 week course) off with a simple needle book. The kids love being able to create something they can use. This needle book shows them the importance of using a pattern, how to pin, and of course, the fun part, sewing!

Simple Needle Book Tutorial


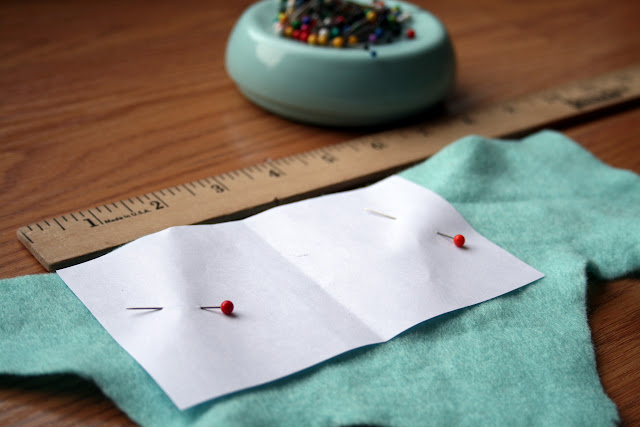
1. We start with a paper pattern roughly measuring 5" x 3".
Pin that to your fabric (felt).
Do this 2 times so that you have two pieces of felt measuring 5" x 3".


2) I cut a small amount off each edge of my inside piece. Then lay one piece on top of the other and pin at the center line.


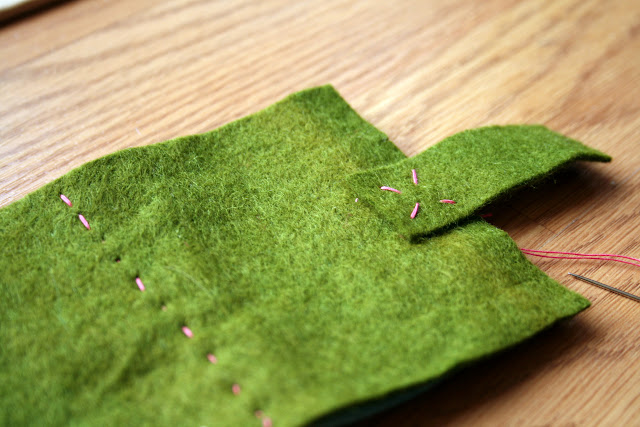
3. Sew both pieces together at the center line (right along the pins).


4. Cut a small rectangle about 1/2" x 2" out of felt. Sew this to the middle of the outside opening edge. This will be the button hole flap.


5. Sew a button on the other top opening edge. Cut a slit in your button hole flap (this is your button hole).


6. Now your book is complete! At this point, any children who get done early can embellish their front cover however they like.


When the book is done, the students get to keep their needle and pins tucked away for next class!