little granny rounds and scented sachets


Who doesn't love to make little granny rounds?  They're so quick.  You can pick whatever colors you want. And they're round, for heavens sake!


I made a big batch of  little scented granny round sachets to sell at the Stitch Market (which starts today!!) in honor of Mother's Day.  Mom's just love little pretty, smelly, hand made things.  They always have.


These are so easy and fun to make, that I've written up a tutorial for Krystina's blog Lollipops.  Go on over there and make yourself some!

a cats cradle lesson

Cats Cradle (also known as Jack in the Pulpit) is one of those games you learn as a kid, and then remember again when you have kids.  It is most likely dated back to ancient China.  It is a string game, played by two people, who aim to make a set of figures (cats cradle being one of them).


1) To set it up, you wind the yarn (this one is 48" long then tied together) around the palm of your hands.
2)  Slip your middle finger under the loop from your opposite hand.  Do this with both middle fingers.
3) Now you've created your first figure "Cat's Cradle"


4) Now the next player pinches the X's with thumb and pointer.
5) She then loops them around the outside string, and up through the middle
6) The first player slips her hands out, and the new player opens her fingers up to create the new figure "Soldiers Bed"


7) Now it's the first players turn again.  She pinches the X's.
8) Pulls them around and then up.
9) Opens her fingers as the other player takes her fingers out.  This figure is called "Candles".


10) This one is the trickiest.  The next player grabs each "candle" with her pinkies.  Each pinky grabbing the candle opposite (so that you actually criss cross your hands to grab the strings).
11)  She pulls them over the outer strings and up through the middle. (all the while, her pinkies are still holding the "candles")
12)  The first player removes her hands, while the new player opens her thumb and pointer.  This figure is now "Manger".


13) The new player reaches in to pinch the X's.
14) She pulls them up, over the string, down, and then up through the middle again.
15) She opens her fingers, the other player takes hers away, and it's back to "Soldiers Bed"

The game can go indefinitely.  You either get all tangled up at some point, or someone decides they've had enough.  Or, you could go on to try for the next worlds record in Cat's Cradle!

how to crochet a granny square

I know there must be a million granny square tutorials out there, but when I haven't made one in a while, and need a refresher, I never can seem to find a good pattern. So here is my recreation of a granny square for myself, and anyone else, who sometimes needs to refresh (or learn anew) their granny square skills.

I like to begin circular patterns with a magic circle.  You will want to chain 4 after you wind the yarn around your finger a few times.
 Then (3dc and chain 1) 3 times total.  2dc then slip stitch into the third chain that you started the round with.  This completes the center of your granny square.  At this point I like to switch colors!
Pull your new color through one of your corners (the chain one space between one of your 3dc groups from the first round).

Now you can work your fist corner.  Chain 3(this counts as your first dc), 2dc and chain 1.  3dc and chain 1.  All this is worked into the same space.
Move to your next corner (the next chain 1 space between the 3dc group from the center of your granny square).  (3dc, chain one, 3dc, chain one) repeat 2 more times (four corners total).  Slip stitch after your last chain one, into the 3rd chain from your first chain in this row.

Now it's time to start your third row.  Pull your new color through any corner and chain 3.
Work your first corner of row 3:  2dc and chain one, 3dc and chain one. * 3dc into the middle  chain 1.   Move to your next corner.  3dc, chain one, 3dc, chain one. *  Repeat from *  3 more times.  Slip stitch into the third chain of your beginning chain.
Add your new color for row 4.  Work your first corner:  Chain 3. 

2dc, chain 1, 3dc, chain 1.  *Move to next chain one space.  3dc, chain 1.  Move to next chain one space.  3dc, chain 1.  Move to next corner.  3dc, chain 1, 3dc, chain 1.* repeat from * 3 more times.  Slip stitch into 3rd stitch of beginning chain.

At this point you can continue to grow your square until it is the size of a blanket (and beyond!) or start making more squares to eventually sew together to make a blanket, pillow, etc.  There are so many things you can do with a granny square!  And yes, at some point you will need to weave in all your loose yarns.


crochet basics {the magic circle}

I wanted to do a series of crochet tutorials.  There are so many fun stitches and patterns out there.  And whether you're learning them for the first time, or if you're like me, you forget from time to time, it's nice to have a source of compiled crochet basics.

The Magic Circle

The magic circle is my preferred way for beginning any crochet pattern that begins with a circle.  You can modify any circular pattern to begin this way.

1)  Wind your yarn around your finger 3 times.  Make sure to have the short end of the yarn at the tip of your finger, and the end attached to the ball of yarn at the base of your finger.

2) Slide your hook under all three strands and grab the third with your hook.

3) Pull that third strand under the other strands on your finger, and keep it on your hook.

 4)  Do a chain stitch with the loop still on your finger.

5)  Pull the whole loop off your finger.

6)  Now, if you are doing a pattern with double crochet you will want to chain 2 more (pictured below).  If you are working a pattern with a singel crochet you will stop with just one chain.

7)  If your work is double crochet, and you chained 3, then do 12 double crochet into the circle (pictured below).  If your work is single crochet, you will do 6 single crochets into the circle.

8)  Now slip stitch your final double (or single) crochet into the top chain that you started with.  You now have a complete circle, with a large center.

9)  Abra Kadabra.... Pull your short tail and watch your circle magically shrink!  Now you can complete your hat, flower, granny square, etc.

sewing lessons :: needle book

I will begin teaching my 4th session Beginning Hand Sewing class this Friday. I just love this class! The students are kinder through 2nd graders (girls and boys!). I've been learning alot about how to teach this craft I love so much. Keeping the projects simple (with room for my advanced students to grow), and keeping my expectations realistic have been my main focus as a teacher. We use mostly felt for our projects which is so easy to work with and comes in amazing colors.

I often start each session (an 8 week course) off with a simple needle book. The kids love being able to create something they can use. This needle book shows them the importance of using a pattern, how to pin, and of course, the fun part, sewing!

Simple Needle Book Tutorial


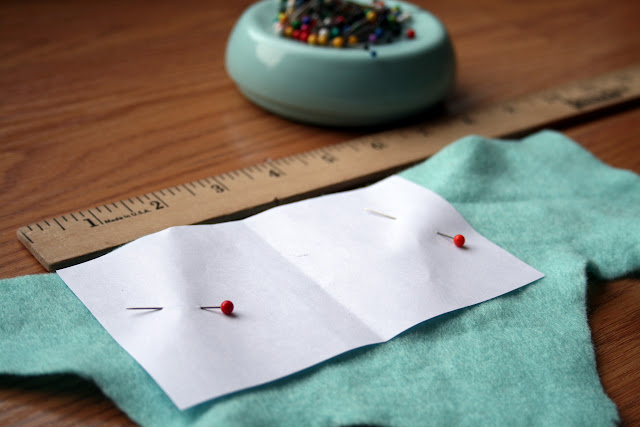
1. We start with a paper pattern roughly measuring 5" x 3".
Pin that to your fabric (felt).
Do this 2 times so that you have two pieces of felt measuring 5" x 3".


2) I cut a small amount off each edge of my inside piece. Then lay one piece on top of the other and pin at the center line.


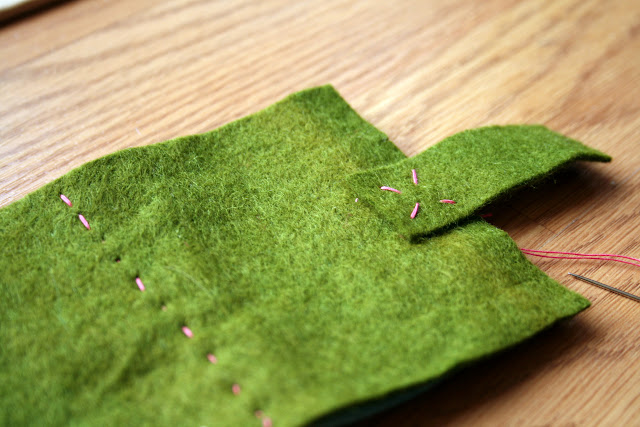
3. Sew both pieces together at the center line (right along the pins).


4. Cut a small rectangle about 1/2" x 2" out of felt. Sew this to the middle of the outside opening edge. This will be the button hole flap.


5. Sew a button on the other top opening edge. Cut a slit in your button hole flap (this is your button hole).


6. Now your book is complete! At this point, any children who get done early can embellish their front cover however they like.


When the book is done, the students get to keep their needle and pins tucked away for next class!

how {not} to make a bias cut skirt: a tutorial

I've made a lot of clothes in my life. I started with Barbie's wardrobe when I was 6.
I sewed my way through college as a costume design major,
and am now sewing clothes for my daughters, and all y'all's daughters too!
I never use a pattern, but often start with something I already have that I like.
But that doesn't mean I do it right every single time.
Usually it doesn't turn out just how I planned,
and there is some alterations that take place before I will actually wear it.
If I like it enough to make it again, I'm one step closer to making it perfect.
The more I make it, the better it gets.
But you've got to start somewhere.
And you've got to not be afraid to just start, and maybe do it wrong.

Here I will show you my first attempt at an easy peasy bias cut skirt
that I do actually wear (in public).


I knew I wanted to use this rust striped polyester I picked up at the Goodwill.
It has a bit of stretch, but not much.
And I wanted a seam up the front with the stripes pointing down.
To cut on the bias means that you are cutting at an exact 45 degree angle from the selvage edge.
An easy way to acheive this is to fold your fabric like you do a snowflake.


I had a skirt that fit me well, so I laid it on top of my bias fold
and felt confident that I would get the right size piece (remembering seam allowances).
But here was my mistake:
I cut both layers.
Which meant that my stripes were not going to meet up in the center.
They both went from high on the left to low on the right.
I needed to cut out another piece to mirror the first,
and then repeat for the backside.


Once I got all four pieces cut out (front and back).
I evened up the hemlines, sewed the seams, and did a topstitch.
I really wanted the look of the topstitch,
and often with polyester anywhere you want a crease, you need to sew it in.
(remember sewn crease front polyester pants?).


For the waistband I just made a long wide strip with my high hip measurement,
including seam allowances.
I doubled the width I wanted it to eventually be,
folded it over and sewed it to the top of the skirt.
Here's what I did wrong:
The polyester does not have much stretch, and so the waistband fit my hips,
but was not tight enough on my waist.
This meant that I needed to retrofit my waistband to fit my waist more snug.


After taking longer than I originally planned (picture a good amount of seam ripping here),
the skirt was finally wearable.
And I actually love it.


From blog photos

laughing and stenciling


what a super fun time i had the other night at my buddy ginger's house!
she was celebrating the end of a very busy season for her
by having a handful of crafty friends over to learn along with her the art of freezer paper stenciling.

ginger may possibly be the funniest person i've ever met.
i don't know if i stopped laughing the entire night!
we had a fabulous meal, a fun tour of her studio,
and learned a new (totally doable) craft.

i have seen this craft recently explained on emily sparks blog
(who is very adorably pregnant).
and i'm sure there are a hundred other tutorials out there.
although, i really do enjoy the in person tutorial, myself.

knowing i was just going to be learning,
i decide to make a few very simple patches to sew on to my girls' library bags.
the girls were pleased.

thanks ginger for the fun night! and kristina for showing us all how!!

easy, no sew, t-shirt remake tutorial

i'm not super fond of the high crew neck many t-shirts have. i really prefer anything else. v-neck, scoop neck, boat neck, etc.

this t-shirt makeover takes just about 5 minutes.

all you will need is a t-shirt, a ruler, and some scissors.

first step is to fold your t-shirt in half so that the shoulder seams match up in the middle

and the center front neckline and back neckline are on opposite ends.

once my shirt is straight and ready

(all lumps and creases have been smoothed away)

i measured 1" from the bottom of the neck ribbing,

cutting both front sections at the same time to ensure an even neckline.

i then tapered my cut toward the shoulder seams to be only 1/2" down from the neck ribbing.

lastly, i cut from the middle back towards the should seams again,

1/2" down from the neck ribbing.

**note: the cuts are actually rather small with a big result. take care you don't cut too much off. you can always cut more, but you can't put back on if you've cut too much.

**

i feel better already!

spiral scarf how-to


i made a handful of these crocheted spiral scarfs for christmas this year.
they turned out so cute and were so easy to make
that i thought i would share the how-to's with you all.

auntie janet shared this simple pattern with me
while we were crocheting side by side on the couch
after our thanksgiving meal.
i couldn't wait to finish my project so that i could try it out.


you'll want to chain stitch the desired scarf length.
i didn't bother counting the stitches,
but my chain stitch measured about 40" long.

after your chain is the desired length,
you'll add 2 more chain stitches before you turn your work.
next, you'll dc (double crochet) into the 3rd stitch from your hook.
now, do 2 dc into every stitch until the end.
you'll notice your scarf beginning to spiral right away.

when you reach the end, it's time to chain 2,
then turn your work and do 2 dc into the first stitch.
next you will do 3 dc into every stitch until you reach the end.

the spiral will get bigger.

to add the fancy picot edging, i changed colors.
i didn't complete my final stitch with the green,
i pulled through the aqua yarn to finish the stitch.
i also caught up the loose threads as i added the fancy border,
but you could just as easily weave it through when the project is done.

after i finished the final dc, i chained 3 stitches with the new color.

then i inserted my hook into the next stitch,
did a single crochet and chained 3 stitches again.
do this over and over until you reach the end.

thanks, auntie janet, for sharing your wonderful crochet secrets!

here is my cute mom modeling her new christmas scarf.

a thrifty re-do

i've had a marvelous time thrifting lately. we're talking some real scores! i found this real cute sweater and bought it "as is"  noting the missing buttons.  I knew that at some point i would need to do a ginger inspired button upgrade on it.

although i thought the original buttons were darling, i used what i had in my stash at the moment, which happened to be some vintage pearly ones. what cardigan doesn't look good with vintage pearly buttons on it?

and even though i tend to not use all the buttons when i'm wearing a cardigan, at least i don't look like i was forced into such a haphazard way of cardigan wearing.

emergency ironing board recover: a tutorial

Of all the things on my "to do" list, this was not one of them. I've always wanted to recover my ironing board, but it was never a necessity. Until today. I absolutely had to recover it.

This is not the material I would dream of when I thought of my perfect ironing board (do you ever dream of your perfect ironing board?). I had two criteria to meet in picking my fabric. 1) it had to be cheap/free, already in my stash, not wanting to be used up on any up and coming projects, and 2) it had to be relatively neutral. There is nothing worse than ironing something and getting sick to your stomach on how it totally clashes with your ironing board. But doesn't everything go with orange and yellow stripes?

Step one: take off that old cover by any means necessary!

Step two: lay down your now naked ironing board on top of some 1/2" foam. Trace around and cut.

Step three: lay your now cut foam on top of your dream ironing board fabric and add three inches before you cut.

Step four: sew under a 1/2" seam around outer edge (I did this with a zig zag to skip the folding under step of a nicer hem, but nobody's going to be looking under your ironing board are they?).


Step five: grab some string (I used cotton yarn). Thread it through the casing you just made.

Step six: position your foam on the ironing board top, then your dream fabric. Smooth and get center, then pull your string tight. This will cinch up your fabric and hold the whole thing tight.

That's it! It took about 1/2 hour, and oh so worth it!